When you want to travel with all your luggage, the best way to go about it is to make use of a roof bag. Roof bags help you to carry a lot of load on your vehicle while you still have enough space for your passengers to sit comfortably in your vehicle.
How do you secure a cargo bag to the roof? Look at the critical steps:
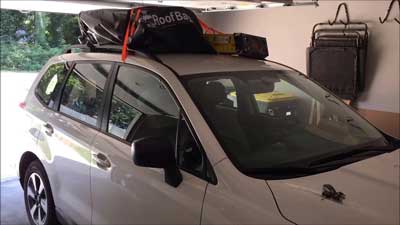
- Step 1: Lay the straps across the cargo
- Step 2: Spread the weight of the roof bag across the roof rack
- Step 3: Make use of pass-through straps
- Step 4: Make use of the outdoor hook strap
- Step 5: Secure the roof bag straps around the roof rails
- Step 6: Be extra cautious to check the roof bag at intervals
If your roof bag is not as tight and secure as it is supposed to be, then you may be putting yourself in some kind of danger.
In the sense that if your roof bag is not tight enough on the roof rack and your vehicle is moving at a high speed, the roof bag could fall off from your vehicle and it will jeopardize not just you, but your passengers and other road users.
When you want to secure a roof bag on the roof rack of your vehicle, the roof bag needs to, first of all, be packed well before it gets on the roof of the vehicle and before you can even think of securing it.
Let us get into the detailed steps in securing your roof bag. The below steps will guide you on what you need to do.
Steps to Secure your roof bag

Step 1: Lay the straps across the cargo
At this point, the roof bag is already on the roof rack on your vehicle. You should get the straps and put them around your roof bag in preparation to get the roof bag strapped.
When you are done with this then you should move on to the next which is to distribute the weight across the roof rack.
Step 2: Spread the weight of the roof bag across the roof rack
Before you strap the roof bag across the cross rails, you need to, first of all, spread the weight of the roof bag across the roof rack.
How you do that is by putting an equal amount of load in the roof bag so that one side will not be heavier than the other.
That way the weight can be spread evenly on the roof rack. You should do this in order to create some balance on the roof rack of your vehicle.
When there is a balance, the roof bag will stay put and there will be no form of movement when you want to strap the roof bag.
There will also be nothing like noise when the vehicle is at a high speed.
Step 3: Make use of pass-through straps
This is one of the straps that you can make use of when you want to secure your roof bag. The design of this strap is so good and it works so well even when you want to make use of it to secure your roof bag.
You are going to find out that these pass-through straps will definitely secure your roof bag. How you make use of it is by passing it inside the vehicle through the door frame.
It has an inside strap that goes into the vehicle and also a top strap which is usually on the top of the roof bag and then buckled with the inside strap.
Once you buckle the inside strap and the pass-through straps, you have a well-secured roof bag while traveling. The top strap and the inside strap is what makes up the pass-through strap.
The advantage of this pass-through strap is that you can use it to secure your roof bag even when there is no roof rack on your vehicle.
Step 4: Make use of the outdoor hook strap
How you make use of the Outdoor hook strap to secure your roof bag is by opening the car doors and then attach the strap hooks onto the hard ridge and then stick it down from the top of the door frame.
You should not allow the hook to be seen from outside and the straps should be between the door and the frame. Take note that when you have put the hook, it should be firm when It is pulling upward on the straps.
Then you close the door over the strap. To secure it, slide the half buckle of the hook into the top of the strap until they properly click. Once you hear the click sound then you know that the roof bag has been secured.
Step 5: Secure the roof bag straps around the roof rails
This is when you start to properly secure the roof bag by tightening the roof bag strap on your roof rails. This adds an added security to your roof bag. Doing this well will help to fully secure your roof bag.
You can also take the strap on your roof bag that is located on the top of your roof bag and then wrap the strap around a solid anchor point.
What I mean by a solid anchor point is the roof rails. Put the straps through the buckle so that it remains tight and secure.
Step 6: Be extra cautious
To be on the safer side, you should be extra cautious with the roof bag, how you do that is by tying the roof rack down to the roof of the vehicle by making use of a rachet.
What this will do is that it will help to secure your roof bag more while you are on transit. You should really do this so that when you are done packing, you will rest assured and you will not have to worry If your load is safe or not.
You should make sure that these steps are correct so as to not make costly mistakes. Securing a roof bag is as good as keeping it from causing problems for you and other road users.
If you do not have a secured roof bag, it could be exposed to falling off from your roof rack while you are on high speed. In essence.
Steps in packing your roof bag

Step 1: Check the instruction manual
This is a normal thing to do even why you buy something new that is not a roof bag? IT should be the very first thing you need to do before packing your roof bag on the roof of your vehicle.
The purpose of this is not to make sure that you are not going against the rules of using the roof bag. Going through the instructions will also help you not to make mistakes when packing the roof bag.
If you do not check the instruction manual, how will you know of the things in which you should and should not do? One of the things that you are to read in the instruction manual is the capacity that the roof bag can hold.
Some roof bags have the capacity of 15 cubic feet, while some have 10 cubic feet etc. You should check the one that your roof bag fits in and make sure that you pack the load in the roof bag according to the roof bag capacity.
If you go against this, it could result in loud noise, and also, if you are not careful enough it could result in an accident if the heavy roof bag eventually falls off the roof of your vehicle while you are on transit.
Make sure you take this first step seriously so that you do not end up overloading your roof bag.
Step 2: Sort your luggage accordingly
When you are done reading all the instructions in the manual, then you should go ahead with this. The reason for sorting your luggage before putting it in the roof bag is because anything cannot just go into the roof bag, especially sharp objects and objects with very rough edges.
Not just sharp objects, but also, those ones that are very heavy. When you are sorting your luggage, you are sorting it in such a way that you separate the ones that are very heavy and the ones that are not, those ones that have good edges and those ones that have sharp edges. You should sort them out accordingly.
This is where you sort out your luggage, sorting it into the heavy, light ones and those with sharp edges, the ones with irregular shapes a. For those that are very heavy, the best place to store those ones is inside your vehicle and not in the roof bag.
Luggage with lighter weight should be kept in the roof bag. If you have luggage that has irregular shapes, be sure to keep those ones in the vehicle so that it does not make the roof bag look awkward.
The fact that the roof bag has a strong material does not mean that you should get sharp objects and throw it inside, you should not do that at all.
Step 3: Pack your load in the roof bag
This is the point where you get to put the load properly in the roof bag. Here, you should have been done sorting out the luggage according to the size and weight. When you have done this it will make it very easy for you to pack all the luggage.
Do not forget that you are to place all the heavier items in the center of the bag so that it will create some balance on the vehicle while it is in transit. All the weight will be distributed evenly.
One tip that will help to keep all your valuables safe when packing your roof bag is that you should wrap it in a plastic bag so that it will be secure even though roof bags are water-resistant, you still need to protect your valuables by making use of a plastic bag.
What this does is that it serves as an added precaution. This will help you to keep your valuables safe and secure. Roof bags are water-resistant, it is understood, but for the sake of your valuables, do not forget to wrap them in a plastic bag, this is because some roof bags can struggle under heavy rain.
To ensure appropriate safety, make sure that you do this. To avoid damaging your valuables.
Step 4: Fasten the roof bag
This is what ends the packing of the roof bag. You have to fasten the roof bag by making use of the zipper.
At this point you must have finished packing all your load inside the roof bag, all the items that are very heavy would be in the vehicle and those ones that do not have so much weight should be in the roof bag.
When you follow these steps you are going to make fewer mistakes and you will do it the right way. Before you finally fasten the roof bag by zipping it.
You should do your final checks, you should check to make sure that all the instructions were followed and that the capacity and weight limit is not exceeded.
All these are to ensure safety while your vehicle is driving at a high speed. When everything clear, zip up your bag and pass it on your roof rack to prepare for your journey.
When you make use of this zipper, it will help to close the bag and then prevent things from falling off the inside of the bag. When you are handling the zippers, you should have in your mind that the zippers are also water-resistant, therefore, they will not be affected or get spoilt when it is raining.
With that, you will rest assured that your zipper is safe, despite the rain that you have exposed it.
These steps that we have listed here are what will help you in packing your roof bag in preparing to secure it because you cannot secure a roof bag that has not been packed. The roof bag has to be mounted on the roof rack before you can start to secure it.
You should first of all look at these steps and properly pack your roof bag then get it prepared to be secured by following these steps that will be explained in this next segment.
Final words on securing a roof bag

I have made it so easy for you, learning how to properly secure a roof bag. The first segment was about how you can properly pack your roof bag in such a way that when you want to secure it, you will see it in a good shape.
You will also help to make it easy for you to secure your roof bag. This is because you cannot secure a roof bag that is not properly packed.
The steps in packing a roof bag were included here, that is to show you how important it is to pack your roof bags well in order to have a very secure and firm roof bag after it has been put on the roof rack of your vehicle.
If you do not take these steps seriously your may be making some mistakes that should not be made, and that may even cost you. But as you are following the steps, you are not going to have difficulties in securing your roof bag. It will go smoothly and easily for you.